Migrate your legacy Vue 2 project from Vue CLI to Vite with ease. Learn from my experience and tips for a smooth transition.

Migrating from Vue CLI to Vite
In this post I will tell you “what & why” I did when migrating from Vue CLI to Vite
Motivation
At work, I’ve had some legacy products that started with Vue 2.
Initially, I wanted to move forward to Vue 3. Unfortunately, everything, as it didn’t break at this place, would eventually be at another.
Soon, I found the one that held me back was from Vue CLI. And I need a backup plan for it. Eventually, I decided to migrate the root first. It means moving from Vue CLI to Vite.
Next, you will find my notes on what I discovered.
If you want to learn more about this case, skip to the third section which I explain what leads to it.
My Notes
Below are 8 points that I concluded from this proccess.
Use this section as the hint if you also do migrating like me.
1. Choose create vite or create-vue
-
Don’t start with
npm create vite. It is for Vue 3. -
Let’s start with
npm create-vue@2. Remember, we are still using Vue 2.
2. Explicit file extension import
In Vite, importing Vue components requires an explicit .vue extension.
- You CANNOT do
import Button from '@/components/button'. - You SHOULD do
import Button from '@/components/button.vue'.
3. Alias of src
In my case, the legacy code has:
<script>tag and the JS files used@as an alias forsrcdirectory.<style>tag used~instead. (It could be because of any reason from former developers.)
Vite makes your single alias config available to all supported features.
I have two options:
- 1st: unifying these aliases
- 2nd: adding another alias config
I chose the first one - unifying them with @.
4. No process.env
Solution is to find all instances of process.env and replace them with import.meta.env ones.
I can make a more fine-grain solution, but I don’t think it is neccessary.
5. No require.context
I believe most of mid-size and above level projects have this:
const req = require.context('./svg', false, /\.svg$/, 'sync')
const requireAll = (reqCtx) => requires.keys().map(reqCtx)

requireAll(req)
This code means load all .svg files in the svg directory and its sub dirs.
If you throw a new svg into this folder, it will be automatically available to the system.
Cool, isn’t it???
Well…!!! Vite doesn’t have require.context.
Fortunately, it has import.meta.globEager.
I replaced the previous with this one:
export const svgs = import.meta.globEager('./svg/*.svg')
If you need the async version, here it is import.meta.glob.
Use them wisely!
6. Testing with Jest
Config Jest is a bit tedious. Jest used CommonJS and doesn’t have an offical support for ESM. That’s why it is a bit counter intuitive.
I can switch to Vitest, but this will expand the scope of my task.
So I decided to continue with Jest test.
Here is the checklist to bypass the tedious jessy 😈 :
- You need
@vue/test-utilsto test Vue components. - You need
vue-jestto load Vue into Jest, but be careful with the version matching. In my case myvue-jestis@vue/vue2-jest - You need
babel-jesteven though your Vite doesn’t. (It is used to load your ESM tests into Jest’s CommonJS code) - You absolutely need
@babel/coreto aid yourbabel-jest. - You absolutely need
babel-plugin-transform-vite-meta-envforimport.meta.env. It is the only tool I found works out of the box.
// package.json
"devDependencies": {
  "@babel/core": "",
  "@vue/test-utils": "",
  "@vue/vue2-jest": "28", // from version matching link above
  "@vue/babel-preset-app": "",
  "babel-jest": "",
  "babel-plugin-transform-vite-meta-env": ""
}
// <empty> version means "just use the latest"
// jest.config.js
{
  // ...
  transform: {
    '^.+\\.vue$': 'vue-jest', // this NOT work
    '^.+\\.vue$': '@vue/vue2-jest', // this works
    '^.+\\.js$': 'babel-jest',
  },
  {
    globals: {
      'vue-jest': { // this one still be 'vue-jest', not the package name
        babelConfig: true
      }
    }
  }
}
// babel.config.js
module.exports = {
  presets: ['@vue/app'],
  plugins: ['babel-plugin-transform-vite-meta-env'],
}
7. Linting
The only notice is setting the sourceType of parserOptions to 'module'.
// .eslintrc.js
module.exports = {
  // ...
  parserOptions: {
    sourceType: 'module',
    ecmaVersion: 'latest',
  },
  // ...
}
8. The hidden Yorkie
By de facto, husky is the most popular companion of lint-staged.
However, migrating from Vue CLI, I found they used yorkie internally.
I decided to use yorkie. This save me from renewing the configuration, which will add another change into Pull Request.
TL;DR - A snapshot of history
In the early days of Vue 3, people still used Vue CLI toolset.
One day, an official announcement has become:
The New Vue
Blazing fast, Vite-powered build toolchain
And we have a notice:
Now we have two guys on a field.
The approaches from these two are vastly different.
With Vue CLI, every integration requires a plugin. You rely on the plugin providers for everything. If you need an upgraded version of the tools/libs in your system, you would wish it was available at the plugin’s repo.
You can do it manually, but it is awful, and high-time consuming.
That is why our plan to jump to Vue 3 from Vue 2 had so many barriers. I depend on two different parties to get what I want.
Vite, on the other hand, provides me with a less configuration solution. It allows me to pick any ones under the list of supported. I install the tool I want, and Vite will automatically detect and apply it. I only need a plugin once I need the extension of Vite’s capacity.
With that in mind, I thought:
What if I can get rid of Vue CLI first?.
It turns out that’s a good idea. Moving to Vite, I am free and happy.
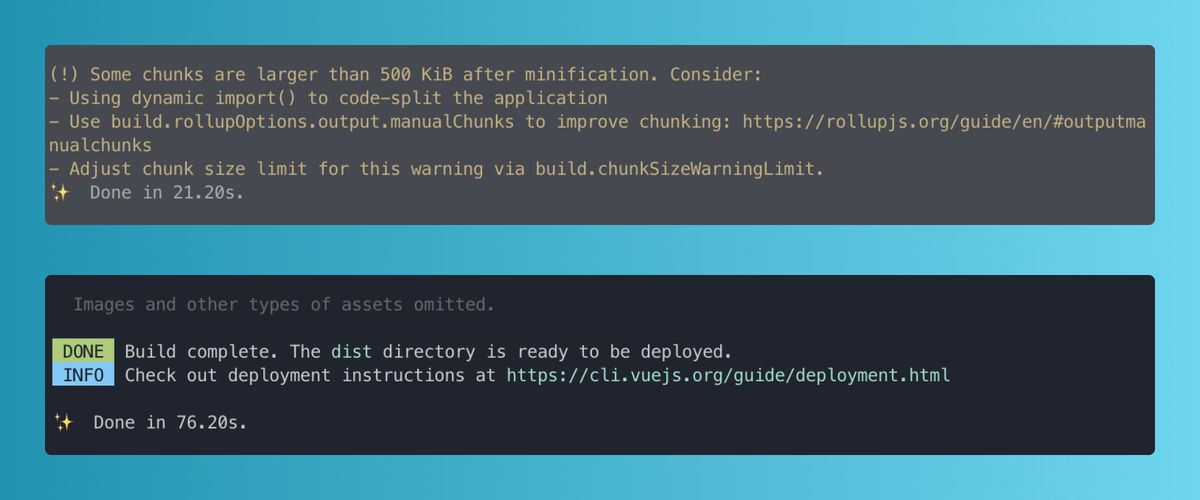
Result
Let me wrap the post with a slice of comparison on production environment:
- Vite:
yarn build --mode production - Vue CLI:
vue-cli-service build --mode production
Final words
Phew! It’s a long post!
Thanks for reading it!
I hope it will give a useful help if you are needing.
— End —